

These paleo peppermint marshmallows with homemade hot chocolate are absolutely to die for. They're gluten free, dairy free & made without refined sugar. Snuggle up with a cup of this magical deliciousness… so rich and ooey gooey!
Just wanted to let you know this marshmallows recipe is sponsored my friends at Vital Proteins!

Peppermint marshmallows & hot chocolate pair perfectly!
Who would have thought it would be so incredibly easy to whip up a batch of homemade peppermint marshmallows and hot chocolate? Seriously, I am in complete awe of this combination.
I have been bringing a few peppermint marshmallows to my closest friends and family since I made them and everyones' reactions have truly been priceless.
Usually, I get: "Really? You made these? Why are they so much fluffier than store bought marshmallows? How come they taste better, too?"
Well, what can I say? A lot, actually... let me fill you in on why these are so glorious.


I've teamed up with Vital Proteins and have utilized their grass-fed beef gelatin in this recipe! 🙂
So many people have caught onto the collagen and gelatin craze, but being able to make homemade marshmallows and use a good quality gelatin is seriously a game changer.
I consumed massive amounts of the two while I was pregnant, and I swear that's why I never got stretch marks.
But for reals... back with these marshmallows!
If you knew how easy it was to make marshmallows, you'd never buy those retched Kraft jet puffed marshmallows again!
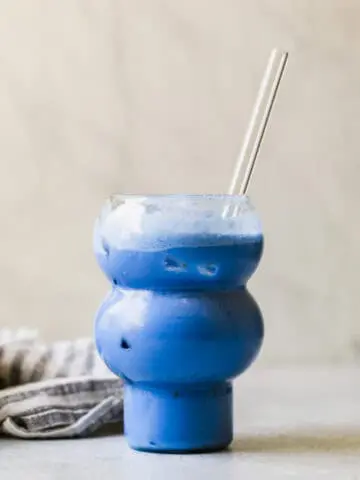
The real kicker is plopping a few of these marshmallows into a cup of the hot chocolate.
They start to melt and become real ooey-gooey; the texture is irreplaceable… nothing like you get from store bought marshmallows.
Peppermint and chocolate are best friends, remember?
Peppermint and chocolate go together better than peanut butter and jelly, too. This is especially true when the Winter months roll around each year.
They have a unique and smoldering connection that their contenders like PB&J just cannot measure up to. What's so wonderful about the entire recipe is that you don't really need any special ingredients.
Chances are if you do any gluten/grain free baking, you have the majority of these ingredients in your pantry already. Hooray for not making extra trips to the market!
Peppermint marshmallows and hot chocolate are officially the best duo I have discovered thus far. I can guarantee you won't have any objections after making this warm, delicious and comforting treat.

This is one of the best things to bring to a social gathering or family party. I love making a couple batches of marshmallows with me so everyone can snack on them ALL night long.
Even after everyone has stuffed themselves endlessly with dessert, they still somehow manage to save some room for these fabulous peppermint marshmallows.
I have now witnessed this phenomenon 2 years in a row.
Just leave the marshmallows out in a large bowl on a couple tables around the house.
I promise they'll ALL be gone by the end of the night. Oh, and people will be asking you for the recipe. Score!

This post is sponsored by the lovely folks at Vital Proteins. Thank you for allowing me to continue creating such incredible content by supporting relationships with incredible brands and companies that The Movement Menu enjoys working with! Opinions will always remain 100% my own!

Peppermint Marshmallows & Hot Chocolate
Ingredients
Peppermint Marshmallows
- ¼ cup arrowroot flour for dusting
- 1 cup water split in two
- 2 ½ tablespoons grassfed gelatin
- ½ cup pure maple syrup
- ¾ cup honey
- pinch sea salt
- 2 teaspoons pure vanilla extract
- ½ teaspoon peppermint extract
Hot Chocolate
- 1 ½ cups canned coconut milk
- 1 cup water
- 1 ½ - 2 tablespoons pure maple syrup or honey
- 3 tablespoons cacao powder or unsweetened cocoa powder
- pinch sea salt
- ½ teaspoon pure vanilla extract
- 1 scoop collagen peptides optional
Instructions
- Lightly grease an 8-inch square pan and line it with parchment paper. Leave enough length on both sides so you can easily use the extra paper as handles when removing the marshmallows from the pan. Lightly sift half of the arrowroot flour into the bottom of the pan. Set aside.
- Add ½ cup of the water into the bowl of a stand mixer. You can alternatively use an electric hand mixer and a large bowl; it will take an extra couple of minutes to reach the desired consistency. Sprinkle the powdered gelatin evenly over the water. Lightly stir to combine, and leave the gelatin to bloom while you continue prepping.
- In a large and tall saucepan, combine the remaining ½ cup of water, maple syrup, honey and salt. Bring the mixture to a boil over medium-high heat. Make sure you keep a close eye on it, as it tends to foam up pretty quickly. (This is why using a very tall saucepan is helpful!) Place a candy thermometer into the saucepan and continue boiling until the temperature reaches 240°F (114°C). This will usually take around 12-14 minutes after it first boils.
- Remove from heat, and immediately fit a whisk attachment to your stand mixer. Turn the mixer on medium-low speech, while simultaneously and steadily pouring in the syrup mixture. Make sure you cover all of the gelatin with it, so it can melt. After the syrup has been incorporated, turn the mixer up to high and continue beating until the mixture has more than doubled in volume and the marshmallow is slightly cool to the touch. This will take anywhere between 6-8 minutes. If you are using a hand mixer to do this, the process will take slightly longer. To ensure the marshmallow is done, turn off the mixer and lift up the whisk. What should happen is the marshmallow cream should slowly fall off the whisk attachment, a lot like lava. Next, beat in the vanilla and peppermint extracts until combined.
- Immediately and quickly transfer the marshmallow to the prepared square pan. Quickly smooth over the top with an offset spatula, making sure the top layer is even. Dust with a thin layer of arrowroot flour.
- Leave the marshmallow cream uncovered in order to set for at least 3.5-4 hours. Carefully lift the marshmallows, using the handles you created with the excess parchment paper, up and out of the baking dish. Cut them into your desired size and toss in a colander with a little bit more arrowroot flour, so they are lightly coated. Make sure you shake off the excess flour well. If you are not using these marshmallows within 1 day, store them in an airtight container in the freezer for up to 1 month. When ready to use, let them defrost at room temperature for 2 hours.
- Prepare the hot chocolate. Combine coconut milk, water, sweetener, cacao and salt in a small saucepan over medium-high heat. Whisk constantly until everything has been combined well. Continue gently whisking until it reaches a low boil. Turn the heat off. Whisk in the vanilla extract and collagen peptides until the collagen is fully incorporated. Serve warm with marshmallows on top.

Chelsea @ DoYouEvenPaleo says
This looks so dang good! Can't beat homemade marshmallows.
RIGHT? My favorite!
Harmony says
These would still work fine if I don't have peppermint extract on hand right?? 🙂
Absolutely!!!! They'll just be plain 🙂 let me know how they turn out!
Simone says
Looks so yum! I love that we were blog post twinsies this week. Great minds... 🙂